


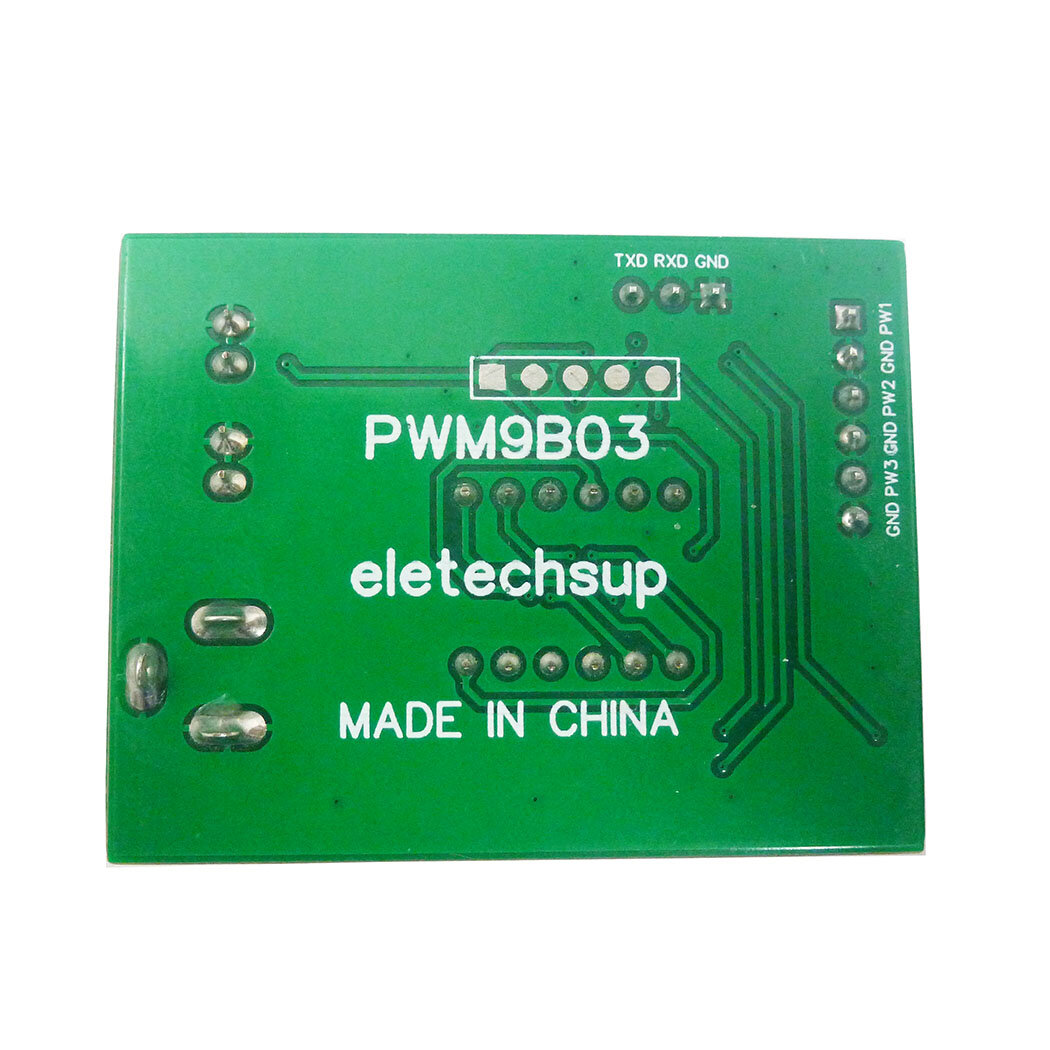

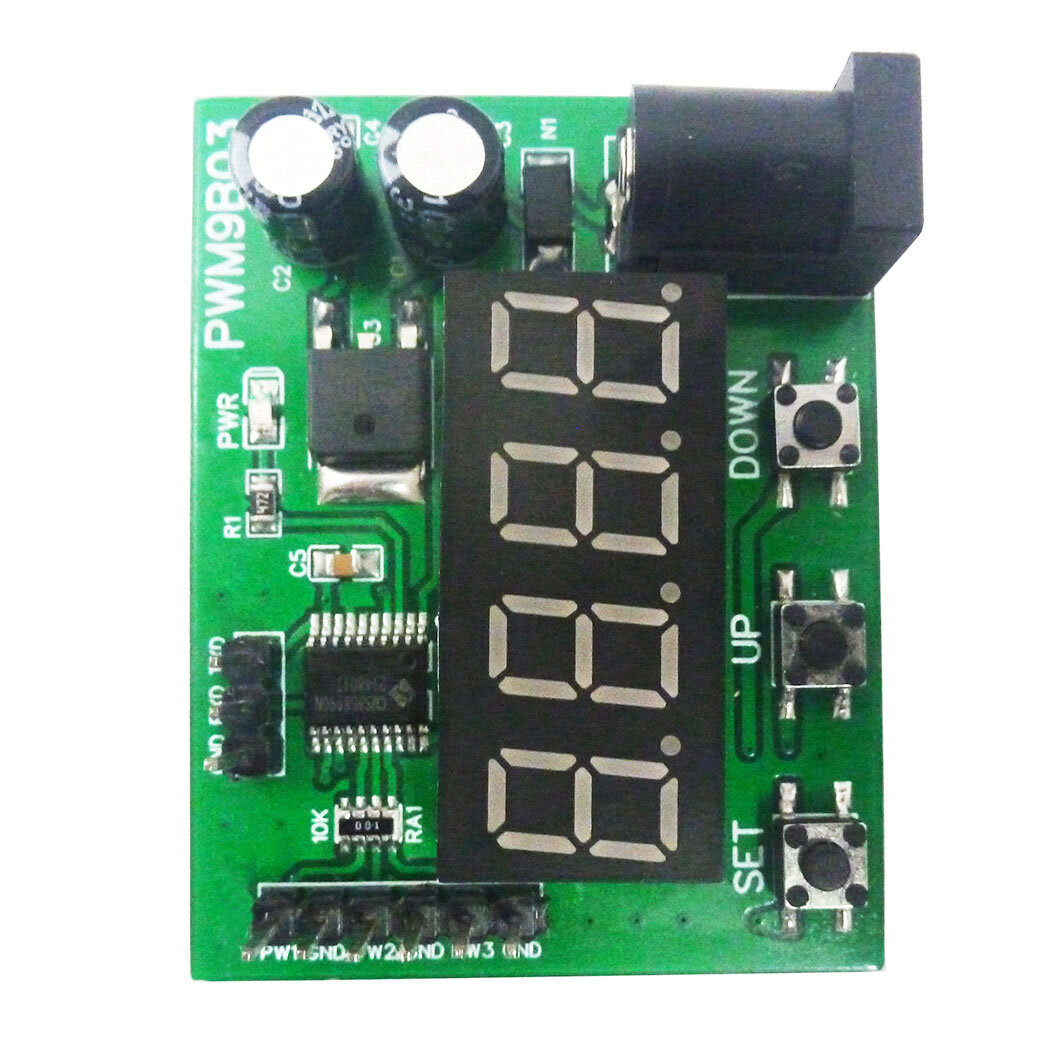
PWM9B03 3-Channel PWM Pulse Signal Generator Module

 Direct purchase from the factory
Mautinoa le saogalemu o le siaki

 Meaalofa e leai se totogi
 Faiga faʻavae o uta
 Faiga faʻavae o le toe faafoi
Meaalofa e leai se totogi
Susū mai i Roymall, lau upega tafaʻilagi faʻapolofesa mo le faʻatauina o meaalofa maualuga. Matou te faʻatauaina ma talisapaia lau lagolago, ma matou te fia faʻaalia la matou faʻafetai e ala i le faʻaopoopoina o se lagona fiafia i au faʻatauga. A e faʻatau mai ia i matou, e le gata e te maua oloa maualuga e faʻaleleia ai lou olaga, ae o le a e mauaina foi se meaalofa e leai se totogi i soʻo se oka e te faia. Sauni e suʻesuʻe la matou aoina ma maua au meaalofa lelei? Suʻesuʻe la matou filifiliga o oloa maualuga, fai lau oka, ma faʻatali mo le fiafia o lau meaalofa e leai se totogi e oʻo mai faʻatasi ma lau faʻatauga.Faiga faʻavae o uta
O le a matou galulue malosi e momoli atu oloa ia te oe pe a uma ona maua au oka ma faʻamautinoa e saogalemu le taunuu. O faʻamatalaga o le uta o le a tuʻuina atu i lau imeli faʻamaonia.I le tele o tulaga, o oka e faʻatautaia i totonu o le 2 aso. I tulaga faʻapitoa, o le a tuai e pei ona taua i lalo: A e faia se oka i le Aso Toʻonaʻi, Aso Sa poʻo aso malolo, o le a tuai mo le 2 aso.E masani lava, e manaʻomia le 5-7 aso faigaluega (Aso Gafua i le Aso Faraile) e aunoa ma le aʻafia i le tuai o vaalele poʻo isi mea tau siosiomaga.Talu ai o la matou auaunaga uta o le lalolagi atoa, o taimi o le uta o le a faʻalagolago i lou nofoaga, ma atonu e manaʻomia ai sina taimi ma faʻatali ma le onosaʻi pe afai o loʻo e i totonu o itumalo mamao poʻo atunuʻu.1. Faiga faʻavae o le toe faafoi & fesuiai
Matou te talia na o mea na faʻatau mai roymall.com. Afai e te faʻatau mai a matou tufatufa i le lotoifale poʻo isi faleoloa, e le mafai ona e toe faafoi ia i matou. E le talia le toe faafoi o mea faʻaiʻu poʻo meaalofa e leai se totogi.Ina ia agavaa mo le toe faafoi, e tatau ona le faʻaaogaina lau oloa ma i le tulaga lava e tasi na e mauaina ai. E tatau foi ona i totonu o le uluai afifiina.Ina ua uma ona maua faʻatonuga toe faafoi mai ia i matou, faʻamolemole afifi au mea e toe faafoi ma lafo lau afifi i le falemeli poʻo se isi avefeʻau.O le a matou faʻatautaia lau toe faafoi poʻo le fesuiai oloa i totonu o le 3-5 aso faigaluega pe a uma ona matou mauaina. O le toe totogiina o le a faʻatautaia ma tuʻuina atu otometi i lau auala muamua o le totogiina.E le mafai ona toe faafoi pe fesuiai mea na gaosia faʻapitoa, e aofia ai le lapoa faʻapitoa, lanu faʻapitoa, poʻo le lolomi faʻapitoa.Manaʻomia nisi fesoasoani, faʻamolemole faʻafesoʻotaʻi matou. service@roymall.com poʻo Whatsapp: +8619359849471
2.Faiga faʻavae o le toe totogiina
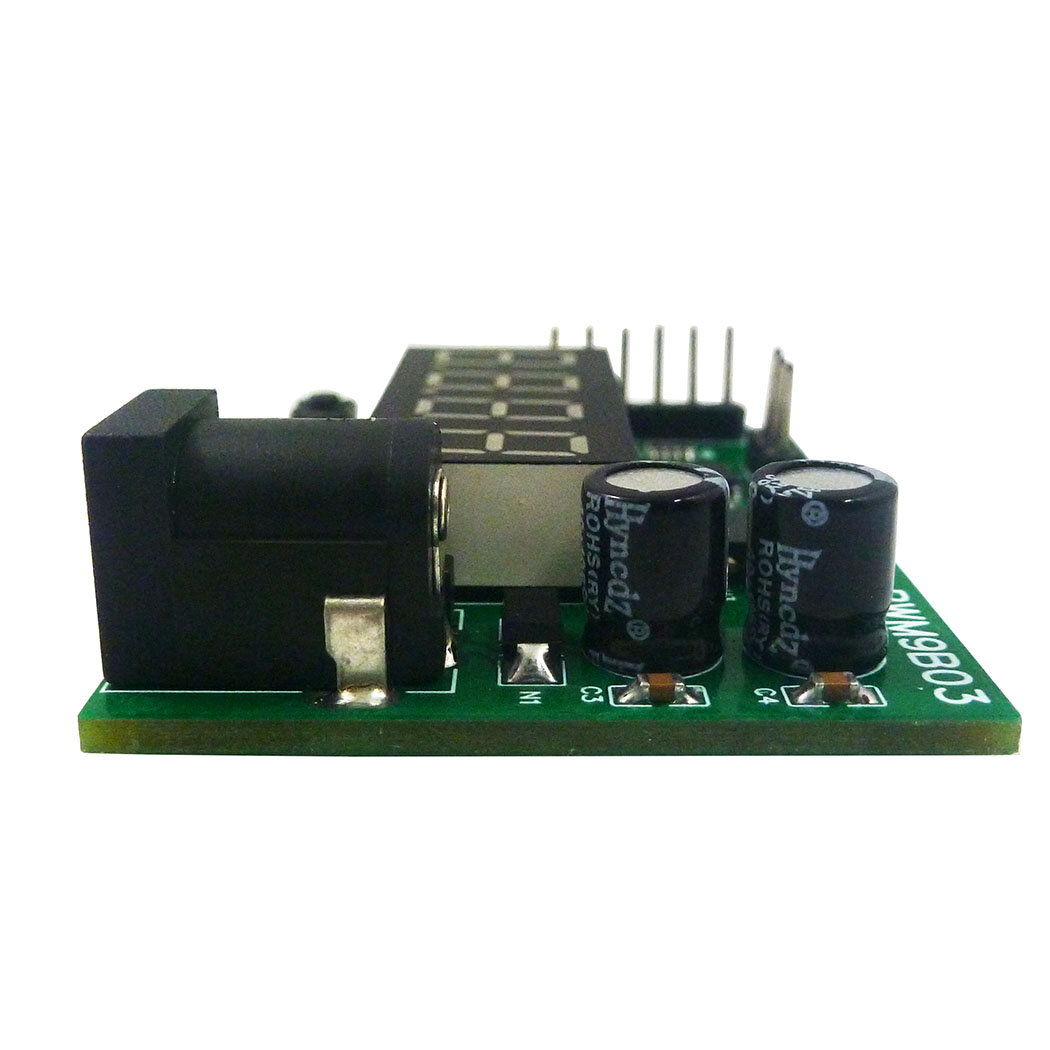
E te maua se toe totogiina atoa poʻo le 100% aitalafu faleoloa pe a uma ona matou mauaina le afifi toe faafoi ma siaki. O le toe totogiina o le a faʻatautaia ma tuʻuina atu otometi i lau auala muamua o le totogiina.Faamolemole ia matau o tau o uta ma soʻo se tiute poʻo pili e le mafai ona toe totogi. O tau faaopoopo o uta e le mafai ona toe totogi pe a uma ona lafo le afifi. O oe e nafa ma le totogiina o nei pili ma matou te le mafaia ona faʻamagalo pe toe totogi, tusa lava pe toe faafoi le oka ia i matou.Pe a matou mauaina ma faʻamaonia lau mea toe faafoi, o le a matou lafo atu ia te oe se imeli e taʻu atu ai ua matou mauaina lau mea toe faafoi. O le a matou faʻailoa atu foi ia te oe le faʻamaoniga poʻo le teena o lau toe totogi.Afai ei ai ni faʻafitauli e uiga i le faagasologa o le toe totogiina, faʻamolemole faʻafesoʻotaʻi matou. service@roymall.com poʻo Whatsapp: +86193598494711 Working voltage: DC 6-24V
2 Working current: DC 12-30MA
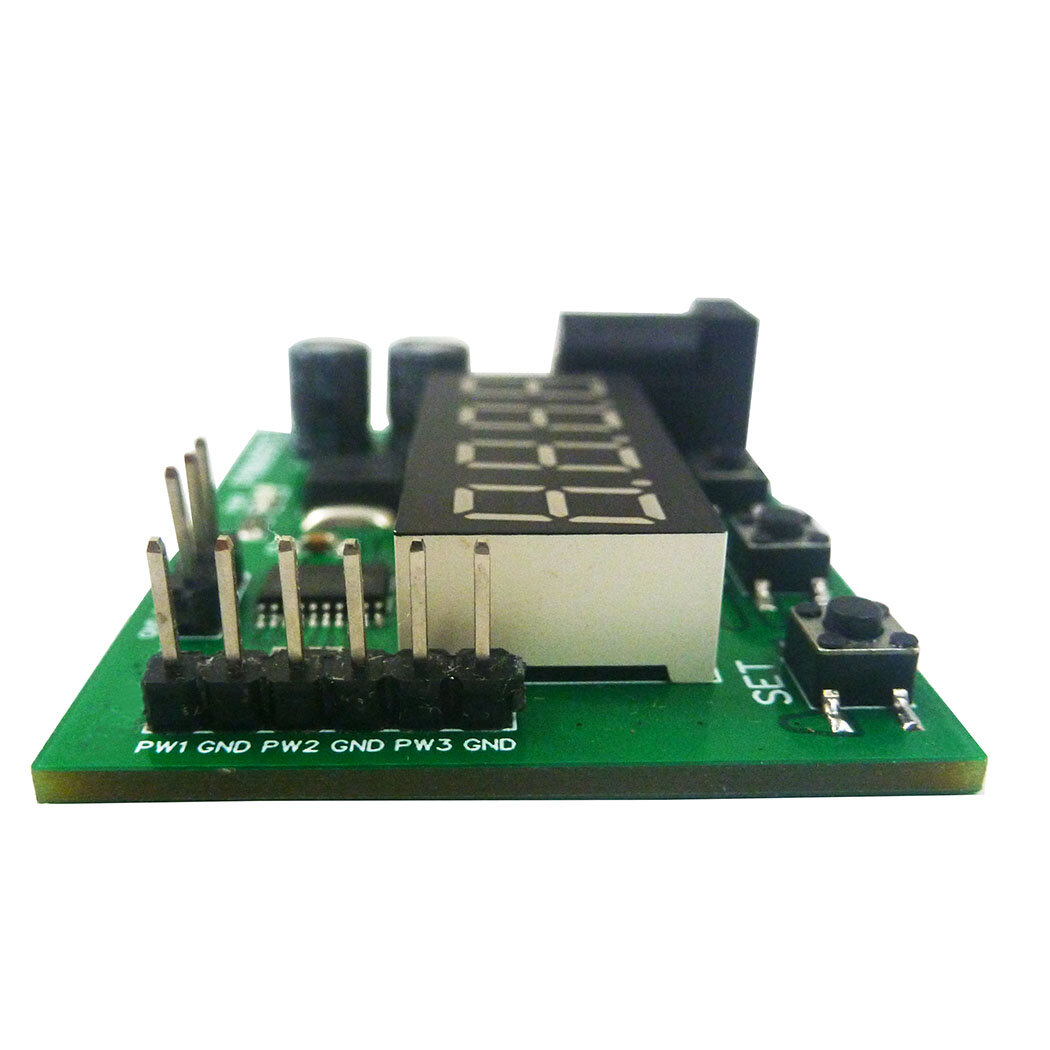
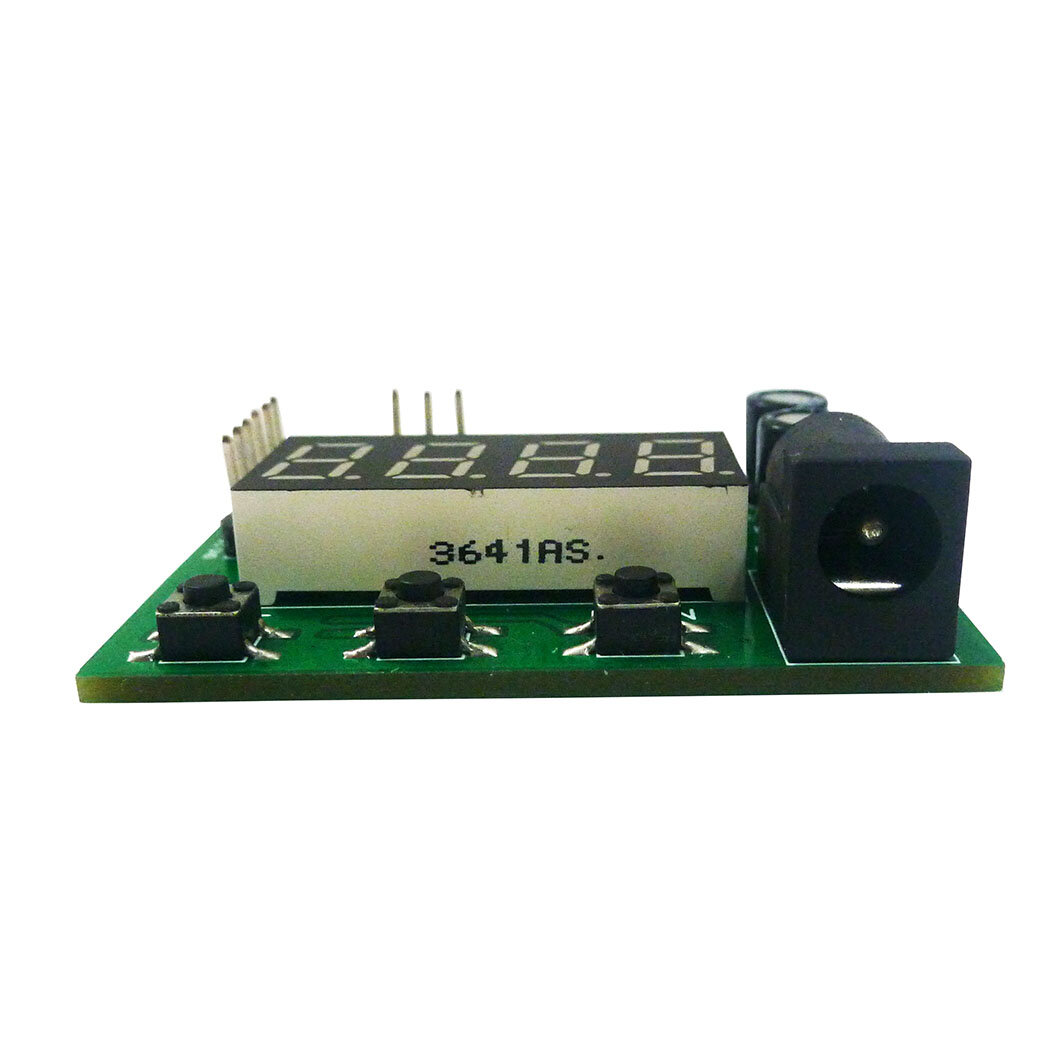
3 3 independent buttons: used to set frequency, duty cycle, working status, etc.;Support long press, short press, simple operation and diverse functions.
4 3 Channels PWM output: PWM Signal can set frequency and duty cycle respectively.
5 PWM signal level: 5V TTL level
6 PWM signal load capacity: <20mA
7 Output frequency accuracy: 0.6% (10-30 Degrees Celsius)
8 Ultra-high frequency range: 20HZ ~ 1MHZ, duty cycle 0-100%.
9. Power-off memory function: power off at any time, the last set data will be recorded and saved when power off, and the data will be displayed when power is turned on again.
10 Automatic exit function: If there is no operation for 36 seconds, the last set data will be automatically recorded, and the dynamic setting state will be exited.
11. Real-time update function: Under the dynamic setting function, you can connect an oscilloscope to grasp the set frequency and duty cycle at any time, and output the precise frequency or duty cycle.
12. Restore production setting function: in dynamic setting mode, press and hold the UP and DOWN buttons at the same time to restore the production setting (after pressing, you need to power off and power on again, the data will be updated to the default data)
13 kinds of application scenarios: The module has a variety of control methods and working modes, and three output channels, which can meet the requirements of different environments.
14 Dimensions: 49 x 38 x 13mm
15 Weight: 14.5g
PWM signal parameter description:
1 PWM frequency: the setting range is 20HZ ~ 1MHZ. The default value is 100HZ.
Four-digit digital tube, the decimal determines the unit of frequency. When there is a decimal point, the unit is KHZ, and when there is no decimal point, the unit is HZ.
The relationship between the digital tube display number and the output frequency:
0034: Indicates that the frequency is 34HZ
0234: Indicates the frequency is 234HZ
1234: Indicates the frequency is 1234HZ
1.234 : indicates that the frequency is 1.234KHZ
12.34 : indicates that the frequency is 12.34KHZ
123.4: Indicates the frequency is 123.4KHZ
0.123: Indicates that the frequency is 0.123KHZ (that is, 123HZ)
2 PWM duty cycle: setting range 0 ~ 100
0: The corresponding PWM remains low
100: The corresponding PWM remains high
1 ~ 99: corresponding duty cycle 0.01 ~ 0.99
The relationship between the digital tube display number and the output duty cycle
0005: Indicates that the output duty cycle is 0.05/5%
0050: Indicates that the output duty cycle is 0.50/50%
Note: 1. Other combinations are also possible, but whether the data can be more accurate is related to your test tool
Package include:
1u00d7 Module Board
How to set PWM output parameters:
Example 1:
For example, the parameters of the three channels are 100HZ/50%, 200HZ/60%, 300HZ/70%
View the parameters of the three channels:
1 Powered on PWM9B03 module, the PWR indicator is on, and the digital tube is off
2 Click the SET button to display PF1 (for 1 second), and then normally display 0100 (channel 1 frequency 100HZ)
3 Click the SET button twice to display dU1 (for 1 second), and then normally display 0050 (channel 1 duty cycle 50%)
4 Click the SET button three times to display PF2 (for 1 second), and then normally display 0200 (channel 2 frequency 200HZ)
5 Click the SET button four times, display dU2 (for 1 second), and then normally display 0060 (channel 2 duty cycle 60%)
6 Click the SET button five times to display PF3 (for 1 second), and then normally display 0300 (channel 3 frequency 300HZ)
7 Click the SET button six times, display dU3 (for 1 second), and then normally display 0070 (channel 3 duty cycle 70%)
Example 2:
Set channel 1 to: frequency 1000HZ, duty cycle 40%
1 Powered on PWM9B03 module , the PWR indicator is on, and the digital tube is off
2 Press and hold the SET button for 3-5 seconds, first display PF1 (for 1 second), and then flash the number
3 Click the UP/DOWN button to adjust the number to 1000 (frequency 1000HZ)
4 Press and hold the SET button for 3-5 seconds for the second time, first display dU1 (for 1 second), and then flash the number
5 Click the UP/DOWN button to adjust the number to 0040 (40% duty cycle)
6 Re-power
Example 3:
Set channel 3 to: frequency 10.12KHZ, duty cycle 60%
1 Powered on PWM9B03 module, the PWR indicator is on, and the digital tube is off
2 Press and hold the SET button for 3-5 seconds, first display PF1 (for 1 second), and then flash the number
3 Press and hold the SET button twice for 3-5 seconds, first display dU1 (for 1 second), and then flash the number
4 Press and hold the SET button three times for 3-5 seconds, PF2 will be displayed first (for 1 second), and then the number will flash.
5 Press and hold the SET button four times for 3-5 seconds, first display dU2 (for 1 second), and then flash the number
6 Press and hold the SET button five times for 3-5 seconds, first display PF3 (for 1 second), and then flash the number
7 Click the UP/DOWN button to adjust the number to 1012, and then click the SET button to adjust the number to 10.12 (frequency 10.12KHZ)
8 Press and hold the SET button for 3-5 seconds for six times, first display dU3 (for 1 second), and then flash the number
9 Click the UP/DOWN button to adjust the number to 0060 (60% duty cycle)
10 Re-power
Example 4:
Factory Reset
1 Powered on PWM9B03 module, the PWR indicator is on, and the digital tube is off
2 Press and hold the SET button for 3-5 seconds, first display PF1 (for 1 second), and then flash the number
3 Press the UP and DOWN buttons at the same time to restore the factory settings
4 Re-power


